I review for BookLook Bloggers

Thursday, October 11, 2012

How to remove data in Active Directory after an unsuccessful domain controller demotion

This article describes how to remove data in Active Directory after an unsuccessful domain controller demotion.

Warning If you use the ADSI Edit snap-in, the LDP utility, or any other LDAP version 3 client, and you incorrectly modify the attributes of Active Directory objects, you can cause serious problems. These problems may require you to reinstall Microsoft Windows 2000 Server, Microsoft Windows Server 2003, Microsoft Exchange 2000 Server, Microsoft Exchange Server 2003, or both Windows and Exchange. Microsoft cannot guarantee that problems that occur if you incorrectly modify Active Directory object attributes can be solved. Modify these attributes at your own risk.

The Active Directory Installation Wizard (Dcpromo.exe) is used for promoting a server to a domain controller and for demoting a domain controller to a member server (or to a stand-alone server in a workgroup if the domain controller is the last in the domain). As part of the demotion process, the wizard removes the configuration data for the domain controller from Active Directory. This data takes the form of an NTDS Settings object that exists as a child of the server object in Active Directory Sites and Services.

The information is in the following location in Active Directory:
CN=NTDS Settings,CN=<servername>,CN=Servers,CN=<sitename>,CN=Sites,CN=Configuration,DC=<domain>...
The attributes of the NTDS Settings object include data representing how the domain controller is identified in respect to its replication partners, the naming contexts that are maintained on the machine, whether the domain controller is a global catalog server, and the default query policy. The NTDS Settings object is also a container that may have child objects that represent the domain controller's direct replication partners. This data is required for the domain controller to operate in the environment, but is retired upon demotion.

If the NTDS Settings object is removed incorrectly (for example, if the NTDS Settings object is removed incorrectly from a demotion attempt), the administrator can manually remove the metadata for a server object. In Windows Server 2008, and Windows Server 2008 R2, the administrator can remove the metadata for a server object by removing the server object in the Active Directory Users and Computers snap-in.

In Windows Server 2003 and Windows 2000 Server, the administrator can use the Ntdsutil.exe utility to manually remove the NTDS Settings object. The following steps list the procedure for removing the NTDS Settings object in Active Directory for a particular domain controller. At each Ntdsutil menu, the administrator can type help for more information about the available options.

Windows Server 2003 Service Pack 1 (SP1) or later service packs – Enhanced version of Ntdsutil.exe

The version of Ntdsutil.exe that is included with Service Pack 1 or later service packs for Windows Server 2003 has been enhanced to make the metadata cleanup process complete. The Ntdsutil.exe version that is included with SP1 or later service packs does the following when metadata cleanup is run:
  • Removes the NTDSA or NTDS Setting subject.
  • Removes inbound AD connection objects that existing destination DCs use to replicate from the source DC being deleted .
  • Removes the computer account .
  • Removes FRS member object.
  • Removes FRS subscriber objects.
  • Tries to seize flexible single operations master roles (also known as flexible single master operations or FSMO) held by the DC that are being removed .
Caution The administrator must also make sure that replication has occurred since the demotion before manually removing the NTDS Settings object for any server. Using the Ntdsutil utility incorrectly may result in partial or complete loss of Active Directory functionality.

Procedure 1: Windows Server 2003 SP1 or later service packs only

  1. Click Start, point to Programs, point to Accessories, and then click Command Prompt.
  2. At the command prompt, type ntdsutil, and then press ENTER.
  3. Type metadata cleanup, and then press ENTER. Based on the options given, the administrator can perform the removal, but additional configuration parameters must be specified before the removal can occur.
  4. Type connections and press ENTER. This menu is used to connect to the specific server where the changes occur. If the currently logged on user does not have administrative permissions, different credentials can be supplied by specifying the credentials to use before making the connection. To do this, type set creds DomainNameUserNamePassword, and then press ENTER. For a null password, type null for the password parameter.
  5. Type connect to server servername, and then press ENTER. You should receive confirmation that the connection is successfully established. If an error occurs, verify that the domain controller being used in the connection is available and the credentials you supplied have administrative permissions on the server.

    Note If you try to connect to the same server that you want to delete, when you try to delete the server that step 15 refers to, you may receive the following error message:
    Error 2094. The DSA Object cannot be deleted0x2094
  6. Type quit, and then press ENTER. The Metadata Cleanup menu appears.
  7. Type select operation target and press ENTER.
  8. Type list domains and press ENTER. A list of domains in the forest is displayed, each with an associated number.
  9. Type select domain number and press ENTER, where number is the number associated with the domain the server you are removing is a member of. The domain you select is used to determine whether the server being removed is the last domain controller of that domain.
  10. Type list sites and press ENTER. A list of sites, each with an associated number, appears.
  11. Type select site number and press ENTER, where number is the number associated with the site the server you are removing is a member of. You should receive a confirmation listing the site and domain you chose.
  12. Type list servers in site and press ENTER. A list of servers in the site, each with an associated number, is displayed.
  13. Type select server number, where number is the number associated with the server you want to remove. You receive a confirmation listing the selected server, its Domain Name System (DNS) host name, and the location of the server's computer account you want to remove.
  14. Type quit and press ENTER. The Metadata Cleanup menu appears.
  15. Type remove selected server and press ENTER. You should receive confirmation that the removal completed successfully. If you receive the following error message, the NTDS Settings object may already be removed from Active Directory as the result of another administrator removing the NTDS Settings object or replication of the successful removal of the object after running the DCPROMO utility.
    Error 8419 (0x20E3)
    The DSA object could not be found


    Note You may also see this error when you try to bind to the domain controller that will be removed. Ntdsutil has to bind to a domain controller other than the one that will be removed with metadata cleanup.
  16. Type quit, and then press ENTER at each menu quit the Ntdsutil utility. You should receive confirmation that the connection disconnected successfully.
  17. Remove the cname record in the _msdcs.root domain of forest zone in DNS. Assuming that DC will be reinstalled and re-promoted, a new NTDS Settings object is created with a new GUID and a matching cname record in DNS. You do not want the DCs that exist to use the old cname record.

    As best practice, you should delete the host name and other DNS records. If the lease time that remains on Dynamic Host Configuration Protocol (DHCP) address assigned to offline server is exceeded then another client can obtain the IP address of the problem DC.
  18. In the DNS console, use the DNS MMC to delete the A record in DNS. The A record is also known as the Host record. To delete the A record, right-click the A record, and then click Delete. Also, delete the cname record in the _msdcs container. To do this, expand the _msdcs container, right-click cname, and then click Delete.

    Important If this is a DNS server, remove the reference to this DC under the Name Servers tab. To do this, in the DNS console, click the domain name under Forward Lookup Zones, and then remove this server from the Name Servers tab.

    Note If you have reverse lookup zones, also remove the server from these zones.
  19. If the deleted computer is the last domain controller in a child domain, and the child domain was also deleted, use ADSIEdit to delete the trustDomain object for the child. To do this, follow these steps:
    1. Click Start, click Run, type adsiedit.msc, and then click OK
    2. Expand the Domain NC container.
    3. Expand DC=Your Domain, DC=COM, PRI, LOCAL, NET.
    4. Expand CN=System.
    5. Right-click the Trust Domain object, and then click Delete.
  20. Use Active Directory Sites and Services to remove the domain controller. To do this, follow these steps:
    1. Start Active Directory Sites and Services.
    2. Expand Sites.
    3. Expand the server's site. The default site is Default-First-Site-Name.
    4. Expand Server.
    5. Right-click the domain controller, and then click Delete.
  21. When you use DFS Replication in Windows Server 2008 and in later versions, the current version of Ntdsutil.exe does not clean up the DFS Replication object. In this case, you can use Adsiedit.msc to correct the DFS Replication objects for Active Directory Domain Services (AD DS) manually. To do this, follow these steps:
    1. Logon a domain controller as a domain administrator in the affected domain.
    2. Start Adsiedit.msc.
    3. Connect to the default naming context.
    4. Locate the following DFS Replication topology container:
      CN=Topology,CN=Domain System Volume,CN=DFSR-Globalsettings,CN=System,DC=Your Domain,DC=Domain Suffix
    5. Delete the msDFSR-Member CN object that has the old computer name.

Procedure 2: Windows 2000 (All versions) Windows Server 2003 RTM

  1. Click Start, point to Programs, point to Accessories, and then click Command Prompt.
  2. At the command prompt, type ntdsutil, and then press ENTER.
  3. Type metadata cleanup, and then press ENTER. Based on the options given, the administrator can perform the removal, but additional configuration parameters must be specified before the removal can occur.
  4. Type connections and press ENTER. This menu is used to connect to the specific server where the changes occur. If the currently logged on user does not have administrative permissions, different credentials can be supplied by specifying the credentials to use before you make the connection. To do this, type set creds DomainNameUserNamePassword, and then press ENTER. For a null password, type null for the password parameter.
  5. Type connect to server servername, and then press ENTER. You should receive confirmation that the connection is successfully established. If an error occurs, verify that the domain controller being used in the connection is available and the credentials you supplied have administrative permissions on the server.

    Note If you try to connect to the same server that you want to delete, when you try to delete the server that step 15 refers to, you may receive the following error message:
    Error 2094. The DSA Object cannot be deleted0x2094
  6. Type quit, and then press ENTER. The Metadata Cleanup menu appears.
  7. Type select operation target and press ENTER.
  8. Type list domains and press ENTER. A list of domains in the forest is displayed, each with an associated number.
  9. Type select domain number and press ENTER, where number is the number associated with the domain the server you are removing is a member of. The domain you select is used to determine whether the server being removed is the last domain controller of that domain.
  10. Type list sites and press ENTER. A list of sites, each with an associated number, is displayed.
  11. Type select site number and press ENTER, where number is the number associated with the site the server you are removing is a member of. You should receive a confirmation listing the site and domain you chose.
  12. Type list servers in site and press ENTER. A list of servers in the site, each with an associated number, is displayed.
  13. Type select server number, where number is the number associated with the server you want to remove. You receive a confirmation listing the selected server, its Domain Name System (DNS) host name, and the location of the server's computer account you want to remove.
  14. Type quit and press ENTER. The Metadata Cleanup menu appears.
  15. Type remove selected server and press ENTER. You should receive confirmation that the removal completed successfully. If you receive the following error message:
    Error 8419 (0x20E3)
    The DSA object could not be found
    the NTDS Settings object may already be removed from Active Directory as the result of another administrator removing the NTDS Settings object, or replication of the successful removal of the object after you run the Dcpromo utility.

    Note You may also see this error when you try to bind to the domain controller that will be removed. Ntdsutil has to bind to a domain controller other than the one that will be removed with metadata cleanup.
  16. Type quit at each menu to quit the Ntdsutil utility. You should receive confirmation that the connection disconnected successfully.
  17. Remove the cname record in the _msdcs.root domain of forest zone in DNS. Assuming that DC will be reinstalled and re-promoted, a new NTDS Settings object is created by using a new GUID and a matching cname record in DNS. You do not want the DC's that exist to use the old cname record.

    As best practice you should delete the hostname and other DNS records. If the lease time that remains on Dynamic Host Configuration Protocol (DHCP) address assigned to offline server is exceeded then another client can obtain the IP address of the problem DC.
Now that the NTDS Settings object has been deleted, you can delete the computer account, the FRS member object, the cname (or Alias) record in the _msdcs container, the A (or Host) record in DNS, the trustDomain object for a deleted child domain, and the domain controller.

Note You do not need to manually remove the FRS member object in Windows Server 2003 RTM because the Ntdsutil.exe utility has already removed the FRS member object when you run the utility. Additionaly, the metadata of the computer account cannot be removed if the computer account of the DC contains another leaf object. For example, Remote Installation Services (RIS) might be installed on the DC.

The Adsiedit utility is included with the Windows Support Tools feature in both Windows 2000 Server and Windows Server 2003. To install the Windows Support Tools, following these steps:
  • Windows 2000 Server: On the Windows 2000 Server CD, open the Support\Tools folder, double-click Setup.exe, and then follow the instructions that appear on the screen.
  • Windows Server 2003: On the Windows Server 2003 CD, open the Support\Tools folder, double-click Suptools.msi, click Install, and then follow the steps in the Windows Support Tools Setup Wizard to complete the installation.
  1. Use ADSIEdit to delete the computer account. To do this, follow these steps:
    1. Click Start, click Run, type adsiedit.msc in the Open box, and then click OK.
    2. Expand the Domain NC container.
    3. Expand DC=Your Domain Name, DC=COM, PRI, LOCAL, NET.
    4. Expand OU=Domain Controllers.
    5. Right-click CN=domain controller name, and then click Delete.
    If you receive the "DSA object cannot be deleted" error message when you try to delete the object, change the UserAccountControl value. To change the UserAccountControl value, right-click the domain controller in ADSIEdit, and then click Properties. Under Select a property to view, click UserAccountControl. Click Clear, change the value to 4096, and then click Set. You can now delete the object.

    Note The FRS subscriber object is deleted when the computer object is deleted because it is a child of the computer account.
  2. Use ADSIEdit to delete the FRS member object. To do this, follow these steps:
    1. Click Start, click Run, type adsiedit.msc in the Open box, and then click OK
    2. Expand the Domain NC container.
    3. Expand DC=Your Domain, DC=COM, PRI, LOCAL, NET.
    4. Expand CN=System.
    5. Expand CN=File Replication Service.
    6. Expand CN=Domain System Volume (SYSVOL share).
    7. Right-click the domain controller you are removing, and then click Delete.
  3. In the DNS console, use the DNS MMC to delete the A record in DNS. The A record is also known as the Host record. To delete the A record, right-click the A record, and then click Delete. Also delete the cname (also known as the Alias) record in the _msdcs container. To do so, expand the _msdcs container, right-click the cname, and then click Delete.

    Important If this was a DNS server, remove the reference to this DC under the Name Servers tab. To do this, in the DNS console, right-click the domain name under Forward Lookup Zones, click Properties, and then remove this server from the Name Servers tab.

    Note If you have reverse lookup zones, also remove the server from these zones.
  4. If the deleted computer was the last domain controller in a child domain and the child domain was also deleted, use ADSIEdit to delete the trustDomain object for the child. To do this, follow these steps:
    1. Click Start, click Run, type adsiedit.msc in the Open box, and then click OK
    2. Expand the Domain NC container.
    3. Expand DC=Your Domain, DC=COM, PRI, LOCAL, NET.
    4. Expand CN=System.
    5. Right-click the Trust Domain object, and then click Delete.
  5. Use Active Directory Sites and Services to remove the domain controller. To do this, follow these steps:
    1. Start Active Directory Sites and Services.
    2. Expand Sites.
    3. Expand the server's site. The default site is Default-First-Site-Name.
    4. Expand Server.
    5. Right-click the domain controller, and then click Delete.

Advanced optional syntax with the SP1 or later versions of Ntdsutil.exe

Windows Server 2003 SP1 introduced a new syntax that can be used. By using the new syntax, it is no longer required to bind to the DS and select your operation target. To use the new syntax, you must know or obtain the DN of the NTDS settings object of the server that is being demoted. To use the new syntax for metadata cleanup, follow these steps:
  1. Run ntdsutil.
  2. Switch to the metadata cleanup prompt.
  3. Run the following command
    remove selected server <DN of the server object in the config container>
    An example of this command is as follows.

    Note The following is one line but has been wrapped.
    Remove selected server cn=servername,cn=servers,cn=sitename,cn=sites,cn=configuration,dc=<forest_root_domain>
  4. Remove the cname record in the _msdcs.root domain of forest zone in DNS. Assuming that DC will be reinstalled and re-promoted, a new NTDS Settings object is created by using a new GUID and a matching cname record in DNS. You do not want the DCs that exist to use the old cname record.

    As best practice, you should delete the host name and other DNS records. If the lease time that remains on Dynamic Host Configuration Protocol (DHCP) address assigned to offline server is exceeded, another client can obtain the IP address of the problem DC.
  5. If the deleted computer was the last domain controller in a child domain, and the child domain was also deleted, use ADSIEdit to delete the trustDomain object for the child. To do this, follow these steps:
    1. Click Start, click Run, type adsiedit.msc, and then click OK.
    2. Expand the Domain NC container.
    3. Expand DC=Your Domain Name, DC=COM, PRI, LOCAL, NET.
    4. Expand CN=System.
    5. Right-click the Trust Domain object,, and then click Delete.
  6. Use Active Directory Sites and Services to remove the domain controller. To do this, follow these steps:
    1. Start Active Directory Sites and Services.
    2. Expand Sites.
    3. Expand the server's site. The default site is Default-First-Site-Name.
    4. Expand Server.
    5. Right-click the domain controller, and then click Delete.

    Original Post:

Delete Failed DCs from Active Directory

When you try to remove a domain controller from your Active Directory domain by using Dcpromo.exe and fail, or when you began to promote a member server to be a Domain Controller and failed (the reasons for your failure are not important for the scope of this article), you will be left with remains of the DCs object in the Active Directory. As part of a successful demotion process, the Dcpromo wizard removes the configuration data for the domain controller from Active Directory, but as noted above, a failed Dcpromo attempt might leave these objects in place.
The effects of leaving such remains inside the Active Directory may vary, but one thing is sure: Whenever you'll try to re-install the server with the same computername and try to promote it to become a Domain Controller, you will fail because the Dcpromo process will still find the old object and therefore will refuse to re-create the objects for the new-old server.
In the event that the NTDS Settings object is not removed correctly you can use the Ntdsutil.exe utility to manually remove the NTDS Settings object.
If you give the new domain controller the same name as the failed computer, then you need perform only the first procedure to clean up metadata, which removes the NTDS Settings object of the failed domain controller. If you will give the new domain controller a different name, then you need to perform all three procedures: clean up metadata, remove the failed server object from the site, and remove the computer object from the domain controllers container.
You will need the following tool: Ntdsutil.exe, Active Directory Sites and Services, Active Directory Users and Computers.
Also, make sure that you use an account that is a member of the Enterprise Admins universal group.
Caution: Using the Ntdsutil utility incorrectly may result in partial or complete loss of Active Directory functionality.
To clean up metadata
  1. At the command line, type Ntdsutil and press ENTER.
C:\WINDOWS>ntdsutil
ntdsutil:
  1. At the Ntdsutil: prompt, type metadata cleanup and press Enter.
ntdsutil: metadata cleanup
metadata cleanup:
  1. At the metadata cleanup: prompt, type connections and press Enter.
metadata cleanup: connections
server connections:
  1. At the server connections: prompt, type connect to server <servername>, where <servername> is the domain controller (any functional domain controller in the same domain) from which you plan to clean up the metadata of the failed domain controller. Press Enter.
server connections: connect to server server100
Binding to server100 ...
Connected to server100 using credentials of locally logged on user.
server connections:
Note: Windows Server 2003 Service Pack 1 eliminates the need for the above step.
  1. Type quit and press Enter to return you to the metadata cleanup: prompt.
server connections: q
metadata cleanup:
  1. Type select operation target and press Enter.
metadata cleanup: Select operation target
select operation target:
  1. Type list domains and press Enter. This lists all domains in the forest with a number associated with each.
select operation target: list domains
Found 1 domain(s)
0 - DC=dpetri,DC=net
select operation target:
  1. Type select domain <number>, where <number> is the number corresponding to the domain in which the failed server was located. Press Enter.
select operation target: Select domain 0
No current site
Domain - DC=dpetri,DC=net
No current server
No current Naming Context
select operation target:
  1. Type list sites and press Enter.
select operation target: List sites
Found 1 site(s)
0 - CN=Default-First-Site-Name,CN=Sites,CN=Configuration,DC=dpetri,DC=net
select operation target:
  1. Type select site <number>, where <number> refers to the number of the site in which the domain controller was a member. Press Enter.
select operation target: Select site 0
Site - CN=Default-First-Site-Name,CN=Sites,CN=Configuration,DC=dpetri,DC=net
Domain - DC=dpetri,DC=net
No current server
No current Naming Context
select operation target:
  1. Type list servers in site and press Enter. This will list all servers in that site with a corresponding number.
select operation target: List servers in site
Found 2 server(s)
0 - CN=SERVER200,CN=Servers,CN=Default-First-Site-Name,CN=Sites,CN=Configuration,DC=dpetri,DC=net
1 - CN=SERVER100,CN=Servers,CN=Default-First-Site-Name,CN=Sites,CN=Configuration,DC=dpetri,DC=net
select operation target:
  1. Type select server <number> and press Enter, where <number> refers to the domain controller to be removed.
select operation target: Select server 0
Site - CN=Default-First-Site-Name,CN=Sites,CN=Configuration,DC=dpetri,DC=net
Domain - DC=dpetri,DC=net
Server - CN=SERVER200,CN=Servers,CN=Default-First-Site-Name,CN=Sites,CN=Configuration,DC=dpetri,DC=net
 DSA object - CN=NTDS Settings,CN=SERVER200,CN=Servers,CN=Default-First-Site-Name,CN=Sites,CN=Configuration,DC=dpetri,DC=net
 DNS host name - server200.dpetri.net
 Computer object - CN=SERVER200,OU=Domain Controllers,DC=dpetri,DC=net
No current Naming Context
select operation target:
  1. Type quit and press Enter. The Metadata cleanup menu is displayed.
select operation target: q
metadata cleanup:
  1. Type remove selected server and press Enter.
You will receive a warning message. Read it, and if you agree, press Yes.


Original Post:

Wednesday, October 10, 2012

Identifying Worker Process (w3wp.exe) – IIS 6.0 and IIS 7.0 for Debugging ASP.NET Application

If you are debugging a ASP.NET web application which is hosted on IIS, you need to attach the particular worker process in Visual Studio to start debugging. To Attach a process we can go to Tools > Attach Process or use shortcut key Ctrl +P. The process window will show the worker process (w3wp.exe) which is currently running on IIS. You need to select the process and click on attach button to start the debugging.
Problem starts when you have multiple worker process running on IIS.  If you have multiple sites hosted on IIS and each site having their own application pool then you will see the list of all worker process in the Process Attach window.

Here  you need to identify the particular worker process which is associated with your application pool.
Note: Whenever we create a new Application Pool, the ID of the Application Pool is being generated and it’s registered with the HTTP.SYS (Kernel Level of IIS) . So whenever HTTP.SYS Received the request from any web application,  it checks for the Application Pool and based on the application pool it send the request
To know more about IIS Request Process, here is one of my aticle How IIS Process ASP.NET Request
Identify Worker Process in IIS 6.0

• Start > Run > Cmd
• Go To Windows > System32
• Run cscript iisapp.vbs
• You will get the list of Running Worker ProcessID and the Application Pool Name.

So, here is your list of all worker process with corresponding application pool name.  From  the Application pool name you can easily identify which worker process is related with your application.
Identify Worker Process in IIS 7.0

From IIS 7.0 you need you to run IIS Command Tool ( appcmd ) .
• Start > Run > Cmd
• Go To Windows > System32 > Inetsrv
• Run appcmd list wp
This will show you list worker process that is running on IIS 7.0 in the similar format of IIS 6.0

Original Post:

How to use IIS Manager to get Worker Processes (w3wp.exe) details information ?

In one of my previous blog post, Identifying Worker Process (w3wp.exe) – IIS 6.0 and IIS 7.0 for Debugging ASP.NET Application  -  I have explained about how we can identify the list of currently running worker process  using command prompt while we need to attach process from visual studio . But do you know for IIS 7.0 and IIS 7.5 we can get the worker process (w3wp.exe) details like Application Pool name, Process ID, CPU Usages from IIS Manager itself. Even you can get details of each worker process for a “Web Gardenscenarios.  So when you need to attach some process for debugging from Visual studio, Instead of going to command prompt, you can easily identify the worker process Id from IIS itself.  
2

Get Worker Processes ( w3wp.exe) List :

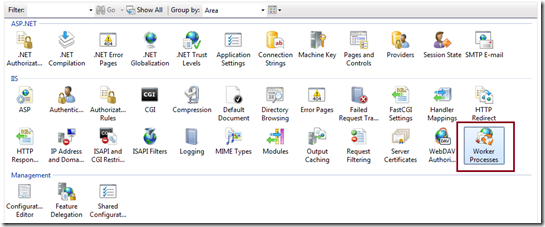
To get list of running  worker process, Open IIS Manager ( Run > Inetmgr ), Select root level from left site navigation tree and from “Features View Panel” select “Worker Processes”
1
Click on the “Worker Processes” to get details of all worker process which are currently running as shown in below.
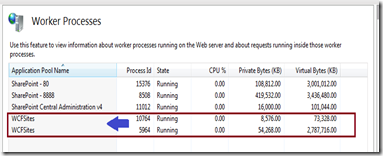
ProcessList
So from the above list of worker processes you can get the details of Application Pool Name, Process ID, state of worker processes along with CPU uses and memory uses.

Attach Worker Processes (w3wp.exe) For Debugging  :

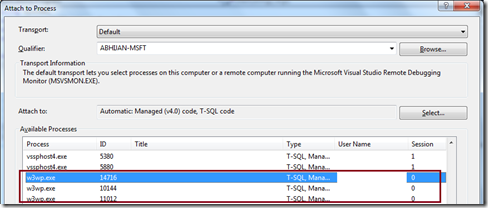
From Visual studio Attach Process window you will find the same list of worker process with the same Process ID. So based on your application Pool name you can attach the process and start the debugging.
AttacheProcess
To Know more about attach process while debugging your application is running on IIS,  please read one of my complete article -  Debug Your ASP.NET Application that Hosted on IIS : Process Attach and Identify which process to attach ( Note: This article was targeted to debugging with IIS 6.0 )

What else we can have from Worker Processes lists in IIS 7 Manager?

We have already identified the worker process  and Application Pool name which are more than enough for us to attach a process from Visual Studio. Now what else we can get out of this list ? Yes we can have enough information regarding worker process like
  • Worker Process Current State
  • CPU Uses by the worker process
  • Memory uses by worker process
  • Current Request Handling by Worker Process

What about the current Worker Process (w3wp.exe ) State  ?

You can get the current status of worker process from status column. Worker processes having 3 status as listed below
  1. Running
  2. Stopping
  3. Starting
image
 RunningState
You must be wondering why there is no  “Stopped” Status for Worker Process in IIS ?  I will explorer it in a different blog post. Yeah that will be very interesting ! Very soon !
Similar like State you can also monitor CPU % Uses and  Memory Uses from the IIS Itself.

What about the Current  Request  at Worker Process ?

Well, you can view the current request details for a particular worker process from IIS Manager Itself. So, When your worker process is on running mode, If you want to check the what are the thing going on backend, just double click on the particular worker process.
CurrentRequest
From the request details, you can get web site id, URL, HTTP Verbs, client ID and State along with Module Name. I liked the State and  Module name column very much. This two columns will let you know where is your current request and which HTTP Module is taking care of that Request.
To know more about how fundamentals How IIS process ASP.NET Request you can read one of my article How IIS Process ASP.NET Request
You can also read  “Securely Implement Request Processing, Filtering, and Content Redirection with HTTP Pipelines in ASP.NET” to know more advance topics.
To know more about Worker Process Request read View Currently Executing Requests in a Worker Process (IIS 7)

View Details of Each Worker Process when you are using Web Garden

Before start web garden mode, if you want to know more about Web garden or just wanted to recap please read on of my previous article  What is the difference between Web Farm and Web Garden ?  
If You have configured  your site as Web Garden, you can also get the list of all the worker process in the worker processes list with the  different worker Process ID  but all worker process should have a “Single Application Pool “ .
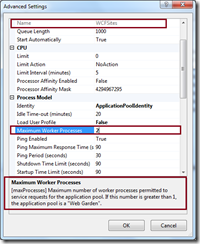
ConfigureWebGarden  WebGardens
So, from the above diagrams you can see, “WCFSite” has configured as  Web Garden mode with Two Worker Process and from the Worker Processes list you can view both the worker process with different Worker Process Id and both of them are listed under  same Application Pool.
Note: You will able to see only the worker process which are in running state .
Summary : In this blog post I have explained how you can use the power of IIS Manager to get the list of worker process with there application pool id, name, Running State along with CPU and Memory Uses along with viewing the worker process request. I have also explained about how to  get details of each worker process in web garden scenarios. I will publish another blog post  Worker Process State very soon.
Hope this will help !
Thanks !

Original Post:

Beginner’s Guide: How IIS Process ASP.NET Request

Introduction

When request come from client to the server a lot of operation is performed before sending response to the client. This is all about how IIS Process the request.  Here I am not going to describe the Page Life Cycle and there events, this article is all about the operation of IIS Level.  Before we start with the actual details, let’s start from the beginning so that each and everyone understand it’s details easily.  Please provide your valuable feedback and suggestion to improve this article.

What is Web Server ?

When we run our ASP.NET Web Application from visual studio IDE, VS Integrated ASP.NET Engine is responsible to execute all kind of asp.net requests and responses.  The process name is “WebDev.WebServer.Exe” which actually takw care of all request and response of an web application which is running from Visual Studio IDE.
Now, the name “Web Server” comes into picture when we want to host the application on a centralized location and wanted to access from many locations. Web server is responsible for handle all the requests that are coming from clients, process them and provide the responses.

What is IIS ?

IIS (Internet Information Server) is one of the most powerful web servers from Microsoft that is used to host your ASP.NET Web application. IIS has it’s own ASP.NET Process Engine  to handle the ASP.NET request. So, when a request comes from client to server, IIS takes that request and  process it and send response back to clients.

Request Processing :

Hope, till now it’s clear to you that what is Web server and IIS is and what is the use of them. Now let’s have a look how they do things internally. Before we move ahead, you have to know about two main concepts
1.    Worker Process
2.   Application Pool
Worker Process:  Worker Process (w3wp.exe) runs the ASP.Net application in IIS. This process is responsible to manage all the request and response that are coming from client system.  All the ASP.Net functionality runs under the scope of worker process.  When a request comes to the server from a client worker process is responsible to generate the request and response. In a single word we can say worker process is the heart of ASP.NET Web Application which runs on IIS.
Application Pool: Application pool is the container of worker process.  Application pools is used to separate sets of IIS worker processes that share the same configuration.  Application pools enables a better security, reliability, and availability for any web application.  The worker process serves as the process boundary that separates each application pool so that when one worker process or application is having an issue or recycles, other applications or worker processes are not affected. This makes sure that a particular web application doesn’t not impact other web application as they they are configured into different application pools.

Application Pool with multiple worker process is called “Web Garden”.
Now, I have covered all the basic stuff like Web server, Application Pool, Worker process. Now let’s have look how IIS process the request when a new request comes up from client.
If we look into the IIS 6.0 Architecture, we can divided them into Two Layer
1.    Kernel Mode
2.    User Mode
Now, Kernel mode is introduced with IIS 6.0, which contains the HTTP.SYS.  So whenever a request comes from Client to Server, it will hit HTTP.SYS First.

Now, HTTP.SYS is Responsible for pass the request to particular Application pool. Now here is one question, How HTTP.SYS comes to know where to send the request?  This is not a random pickup. Whenever we creates a new Application Pool, the ID of the Application Pool is being generated and it’s registered with the HTTP.SYS. So whenever HTTP.SYS Received the request from any web application, it checks for the Application Pool and based on the application pool it send the request.

So, this was the first steps of IIS Request Processing.
Till now, Client Requested for some information and request came to the Kernel level of IIS means at HTTP.SYS. HTTP.SYS has been identified the name of the application pool where to send. Now, let’s see how this request moves from HTTP.SYS to Application Pool.
In User Level of IIS, we have Web Admin Services (WAS) which takes the request from HTTP.SYS and pass it to the respective application pool.

When Application pool receive the request, it simply pass the request to worker process (w3wp.exe) . The worker process “w3wp.exe” looks up the URL of the request in order to load the correct ISAPI extension. ISAPI extensions are the IIS way to handle requests for different resources. Once ASP.NET is installed, it installs its own ISAPI extension (aspnet_isapi.dll) and adds the mapping into IIS.
Note : Sometimes if we install IIS after installing asp.net, we need to register the extension with IIS using aspnet_regiis command.

When Worker process loads the aspnet_isapi.dll, it start an HTTPRuntime, which is the entry point of an application. HTTPRuntime is a class which calls the ProcessRequest method to start Processing.

When this methods called, a new instance of HTTPContext is been created.  Which is accessible using HTTPContext.Current  Properties. This object still remains alive during life time of object request.  Using HttpContext.Current we can access some other objects like Request, Response, Session etc.

After that HttpRuntime load an HttpApplication object with the help of  HttpApplicationFactory class.. Each and every request should pass through the corresponding HTTPModule to reach to HTTPHandler, this list of module are configured by the HTTPApplication.
Now, the concept comes called “HTTPPipeline”. It is called a pipeline because it contains a set of HttpModules ( For Both Web.config and Machine.config level) that intercept the request on its way to the HttpHandler. HTTPModules are classes that have access to the incoming request. We can also create our own HTTPModule if we need to handle anything during upcoming request and response.

HTTP Handlers are the endpoints in the HTTP pipeline. All request that are passing through the HTTPModule should reached to HTTPHandler.  Then  HTTP Handler  generates the output for the requested resource. So, when we requesting for any aspx web pages,   it returns the corresponding HTML output.
All the request now passes from  httpModule to  respective HTTPHandler then method and the ASP.NET Page life cycle starts.  This ends the IIS Request processing and start the ASP.NET Page Lifecycle.

Conclusion

When client request for some information from a web server, request first reaches to HTTP.SYS of IIS. HTTP.SYS then send the request to respective  Application Pool. Application Pool then forward the request to worker process to load the ISAPI Extension which will create an HTTPRuntime Object to Process the request via HTTPModule and HTTPHanlder. After that the ASP.NET Page LifeCycle events starts.
This was just overview of IIS Request Processing to let Beginner’s know how the request get processed in backend.  If you want to learn in details please check the link for Reference and further Study section.

Original Post:

HOWTO: Diagnose 401.x HTTP errors on IIS

One of the most common questions asked about IIS on the newsgroups as well as Microsoft Product Support is "why am I getting 401 Access Denied"?
There are many, many possible causes and variations, but from the IIS perspective, the top-level, logical categories are fixed. This information can help dramatically narrow down the scope of any investigation, but unfortunately, few people know to take advantage of this information. This is what I am going to address with this entry - how to use and diagnose the 401.x error codes on IIS.

Step 1: Determine the SubStatus Code

When you get a 401 response in the browser from IIS and you want to troubleshoot it, the first thing you should do is determine what "type" (i.e. HTTP substatus) of 401 it is.
Starting with IIS 6.0, the IIS web log files located at:
%SYSTEMROOT%\System32\LogFiles\W3SVC###\*.log
record both the HTTP status and substatus code, which when combined with the Win32 error code can aid to troubleshoot many 401 errors. The W3C log entries look like the following, with the HTTP status, substatus, and Win32 error codes highlighted.
#Software: Microsoft Internet Information Services 6.0
#Version: 1.0
#Date: 2005-05-21 05:39:27
#Fields: date time s-ip cs-method cs-uri-stem cs-uri-query s-port cs-username c-ip cs(User-Agent) sc-status sc-substatus sc-win32-status 
2005-05-21 05:39:27 192.168.0.101 GET /VirtualServer/VSWebApp.exe view=1 1024 WEBBROWSER\User 192.168.0.101 Mozilla/4.0+(User-Agent) 200 0 0
2005-05-21 05:39:27 192.168.0.101 GET /VirtualServer/scripts/VSScripts.js - 1024 - 192.168.0.101 Mozilla/4.0+(User-Agent) 401 2 5
2005-05-21 05:39:27 192.168.0.101 GET /VirtualServer/scripts/VSScripts.js - 1024 - 192.168.0.101 Mozilla/4.0+(User-Agent) 401 1 2148074254
2005-05-21 05:39:27 192.168.0.101 GET /VirtualServer/scripts/VSScripts.js - 1024 WEBBROWSER\User 192.168.0.101 Mozilla/4.0+(User-Agent) 304 0 0
You can also get the substatus code from the HTML response itself, but web browsers like Internet Explorer have options like "Show Friendly HTTP Errors" which obscure the detailed error response by making them "simple" and "user friendly", so if you want the real error response, you need to turn off that option.
Unfortunately, prior to IIS 6.0, the IIS web log files are useless in distinguishing 401 substatus because it does not even record it. Your only option is to figure this out from the HTML response itself, assuming the 401.x Custom Error pages for that URL's scope are configured to send different HTML pages for each type of error.

Step 2: Determine Course of Action

Once you have determined the HTTP substatus code, you can start narrowing down the types of failures and causes. The following are the fixed categories that IIS reports. I will give detailed explanation of what each means as well as some common causes/solutions (obviously not exhaustive).

401.1 Denied by Invalid User Credentials

This error indicates that IIS failed to obtain an NT user token with which to execute the request.
In a nutshell, IIS expects to have a NT user token at the end of Authentication (even anonymous authentication - see this URL for details), and if this does not happen, you get 401.1.
Some common causes include:
  • The client gave the wrong username/password (including none at all). This could be from incorrect cached auto-login attempt by the browser, or from a user login dialog from the browser.
  • Invalid Kerberos configuration - on IIS6, if you have a customized Application Pool Identity AND Integrated Authentication is used AND the web server is in a domain, you will mysteriously get 401.1 unless you configure SETSPN *or* change Integrated Authentication to favor NTLM. See the following URLs on Application Pool Identity, Integrated Authentication in IIS, and Constrained Delegation configuration as well as this URL on additional Kerberos-related troubleshooting for more information
  • You enabled Anonymous authentication, yet you still get 401.1 for all requests. One common cause is if the configured anonymous user credentials stored in the IIS metabase configuration file is DIFFERENT than the user principle's credentials in reality (i.e. mismatched password). In all cases, the preferred solution is to manually synchronize the username/password of the anonymous user principle in IIS with that of the real user principle. I have seen many amazing variations of this cause, including:
    • For testing purposes, the user types in his/her OWN username/password as anonymous user credentials at some point in the past and forgets about it. Later, when password policy forces them to change their password, the anonymous user credentials stored in IIS configuration is now mismatched with reality. On subsequent anonymous requests, IIS fails to login and obtain a NT user token for anonymous authentication and fails with 401.1, and it looks like IIS is just plain buggy and could not even support anonymous authentication.
    • I have also seen the reverse happen - user configures IIS to use their username/password as anonymous user, and when they changed their password, web server traffic quickly causes IIS to incorrectly login with wrong user credentials too many times, causing their user account to be locked out. These users now complain that their user account is mysteriously getting locked out as soon as it is unlocked, even before they log in anywhere.
    • On upgrading from IIS 5 to IIS 6, IIS Sub Authentication (i.e. the "allow IIS to control anonymous user's password" feature) is enabled by default for compatibility. This allows IIS to log in the anonymous user principle without actually keeping the user credentials in sync, and anonymous authentication looks good while in IIS 5 Compatibility Mode. However, as soon as you switch into IIS 6 Worker Process Isolation Mode, Sub Authentication is disabled because it requires a privileged process identity like Local System (which is a known and quite unnecessary security risk for the lowly purpose of password sync). This means that IIS 6 now tries to log in the anonymous user credentials stored in the metabase, which has probably NEVER been kept in sync with reality through the upgrade... and you now get 401.1 for every single anonymous request. To a casual user, it looks like switching into IIS 6's native mode simply breaks anonymous authentication and the rest of the website.
  • The server has been reconfigured to deny necessary login privileges for the authenticating user or its containing group (either anonymous or through some authentication protocol). This can be done through automated re-application of Group Policy for domain members, DCPROMO to/from Domain Controller, or static application of security templates. What ends up happening is that the server-side reconfiguration may remove Local/Remote Login rights for that user, impose new restrictions (like Login hours, Logon type), etc... preventing IIS from successfully logging in the user to execute requests and resulting in 401.1.
  • Your event log could be full for some reason - see KB 832981.

401.2 Denied by Server Configuration

This error indicates that the web server is configured to require certain authentication protocols for communication, but the browser failed to use any of those authentication protocols. The corrective action should be to either configure to require an authentication protocol acceptable to the client, or use a client that satisfies the server authentication protocol requirements.
  • A common cause of this issue happens with the older Netscape/Mozilla browser clients and an IIS web server configured to require Integrated Authentication. These browser clients did not understand Integrated Authentication, so when IIS required Integrated Authentication and the browsers repeatedly ignored those responses, IIS will return 401.2 indicating that the browser failed to use an authentication protocol required by the server. Newer Mozilla browsers like FireFox do not have this deficiency.
  • Another possible cause is when using Integrated Authentication over the Internet. Integrated Authentication (NTLM) is a connection-based authentication protocol, meaning that an authenticated connection between a client and server is the only proof of authenticity. This works fine in Intranet scenarios, but for Internet scenarios a lot of network devices in between the client and server can either not support or mishandle NTLM (such as Proxy Server connection pooling/multiplexing), causing unexpected 401.2. Here is how it happens: since NTLM is connection-based authentication, once a client successfully authenticates using NTLM, it often re-uses its end of the connection and simply sends anonymous requests over it. Now, assume an intervening proxy server pools connections between client and server, is unaware of NTLM, and independently decides to send the client's request over *another* connection in its pool (instead of the already authenticated one) to the server. This causes the client's anonymous request to be sent to the server over a new, unauthenticated connection, and the server dutifully rejects it with a 401.2 since the server requires Integrated authentication. The 401.2 rejection is totally unexpected by the client since it thought it was re-using an authenticated connection and did not initiate any re-authentication. Yup, fun... ;-)
    Common variations of an "intervening proxy server" include:
    • "Web Accelerators", such as the Google Web Accelerator. These programs basically act like a local "caching proxy" such that requests for content has a higher chance of coming from your local hard drive than over the network, thus "speeding up" apparent web access.
    • Web Anonymizers - these programs basically disguise your own IP and other request characteristics with their proxy's IP and characteristics, and this is shared amongst all their users, thus providing anonymity through numbers.
    • Sniffer tools like Fiddler for IE - these programs act like "Web Accelerators" except instead of caching request/responses, it chooses to selectively capture and display those request/responses for user analysis.
    • Web Access Proxies for some broadband providers or preset Company proxies - these are the traditional obvious proxies.

401.3 Denied by Resource ACL

This error indicates that the web server was able to authentication and obtain SOME NT user token to process the HTTP request (you still have to determine WHICH user's token...), but that NT user token lacks the FileSystem ACLs to access the requested resource. This is the typical "access denied" due to missing file ACLs that people assume, and yes, you will likely need to adjust ACLs to resolve this issue.
However, realize that all of the OTHER 401.x errors have nothing to do with ACLs, so I recommend AGAINST tweaking resource ACLs to "Everyone: Full Control" to remove ACL issues from the picture. You should be able to determine the exact user that fails to have ACLs to the resource, and just adjust ACLs for that user on the necessary resources and resolve the issue
Common causes include:
  • Wrong/Missing ACLs on the file for the authenticated user. You need to change the ACLs or change the user to an identity that has correct ACLs on the file.
  • You are not authenticating with the authentication protocol you think, and thus the user principle may be unexpected. Reconfigure the authentication protocols as-appropriate so that you end up running as user identity you expect on the server.
  • If your content is on a UNC share, you may have mismatched NTFS ACLs vs. UNC Share ACLs.
A useful tool to pragmatically determine access-denied to file resources is File Monitor.

401.4 Denied by Custom ISAPI Filter

This error indicates that some ISAPI Filter running on that request sent back a structured 401 response of some sort.
The reasons why the ISAPI Filter is returning such 401 responses are completely arbitrary and uncontrollable by IIS. You will need to determine WHICH ISAPI Filter is returning this response and obtain support for this ISAPI Filter to resolve the issue.

401.5 Denied by Custom ISAPI/CGI Web Application

This error indicates that some ISAPI Extension or CGI Web Application sent back a structured 401 response of some sort.
The reasons why the CGI/ISAPI are returning such 401 responses are completely arbitrary and uncontrollable by IIS. You will need to determine WHICH CGI/ISAPI is returning the response and obtain support for it.
In the case of requests that execute .DLL or .EXE requests, the CGI/ISAPI binary is clear. In the case of requests with Extensions that have Application Mapping (i.e. the .asp extension is mapped to the ASP ISAPI DLL Script Engine), you need to look up the extension and its associated Application Mapping in the URL's scope to determine the Script Engine to obtain support.
Starting with IIS6, it is also possible for Wildcard Application Mappings to execute on any request within its configured scope prior to executing the actual handler for the request. It is conceptually like how an ISAPI Filter can act on a .asp request before the ASP ISAPI handler processes the request.
A popular scenario for Wildcard Application Mapping is to implement custom authentication, so a 401.5 on a .html file may indicate presence of a Wildcard Application Mapping-based custom authentication. To the astute reader - .html is handled by the Static File Handler by default, which will only return 401.3 for access denied... so if you see a 401.5 involved with a resource like .html that is usually NOT associated with an Application Mapping which can only return 401.5 for access denied... you know either a Wildcard Application Mapping, or non-standard Application Mapping for .html is involved.
To determine which Wildcard Application Mapping is involved on a request, you have to use the IIS Manager to look up the EFFECTIVE Wildcard Application Mapping for that request, starting from the web page of the URL itself and working up the directory tree until you find the nearest Mapping definition. Yes, it is a major hassle prior to IIS7 to determine the effective Application Mapping of a request for support purposes.
Starting with IIS7, you can use Failed Request Tracing to determine all handlers that executed in sequence on a given request, which will show exactly what module / application mapping caused the 401.5. This makes it extremely easy to identify the faulty DLL without trying to calculate effective Wildcard Application Mapping configuration.

Conclusion

401.1 through 401.3 errors are associated with IIS request processing and allow the logical interpretations and assumptions that I listed above.
Meanwhile, the 401.4 and 401.5 errors are the most arbitrary to diagnose since custom ISAPI DLLs and CGI EXE can cause IIS to behave in non-obvious manners. Thus, much of the logical assumptions about 401.x do not apply.
I hope that this information has been useful in deciphering the 401.x errors from IIS. If you have additional questions, feel free to post a comment or post a private question via the "contact" link.
Recently, we have also released a tool, AuthDiag, to help troubleshoot IIS access denied issues. You can download it from this location. In particular, it has a feature to hook in to various failure points in IIS and directly troubleshoot what is failing on a given request - you need to see and try it out!
Good Luck.

Original Post:

What is the difference between Web Farm and Web Garden ?

I have been asked this question many times by different readers of my blog. They wanted to know about the fundamentals of Web Farms and Web Garden . In this blog post  I am going to explain the what is the exact difference between web farm and web garden, what are the advantages and disadvantages of using them. I have also described how to create web garden in different version of IIS.
Overview :
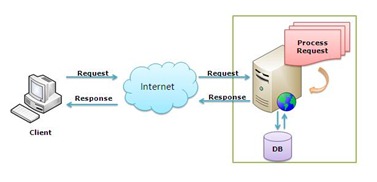
Visual Studio having its own integrated ASP.NET engine which is used to run the ASP.NET Web application from Visual Studio. ASP.NET Development Server  is responsible for execute all the request and response from client. Now after the end of development, when you want to host the site on some server to allow other peoples to access, concept of web servers comes in between.  A web server is responsible for  provide the response for all the requests that are coming from clients. Below diagram showing the typical deployment structure of a ASP.NET Web application with a single IIS.
2 Clients request for resources and IIS Process the request and send back to clients. If you want to know more details on How IIS Process the request please read one of my article over “How IIS Process ASP.NET Request ?” .
Web Farm :
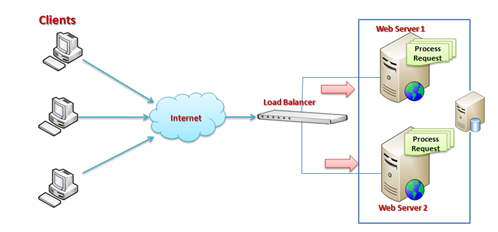
This is the case, where you have only one web server and multiple clients requesting for the resources from the same server. But when there is huge numbers of  incoming traffic for your web sites, one standalone server is not sufficient to process the request.  You may need to use multiple server to host the application and divide the traffic among them.  This is called “Web Farm” . So when you are hosting your single web site on multiple web server over load balancer called “Web Farm”. Below diagram showing the over all representation of Web Farms.
 Web Farms
In general web farm architecture, a single application is hosted on multiple IIS Server and those are connected with the VIP ( Virtual IP ) with Load Balancer. Load Balancer IP’s exposed to external worlds to access. So whenever some request will come to server from clients, it will first hit the Load Balancer, then based on the traffic on each server LB distributed the request to corresponding web server.  These web server may share same DB server or may be they can use replicated server in the back end.
So, In a single statement, When we host a web application over multiple web server to distributed the load among them  is called Web Farm.
Web Garden :
Now, let’s have a look, what is Web Garden ?  Both the terms  sounds same,  but they are totally different with each other.  Before starting with Web Garden, I hope you have fundamental idea of what is Application Pool and what is Worker Process.  If you have already read the article  “How IIS Process ASP.NET Request ?” article then I can expect that you have now good idea on both of them.
Just to recall,  When we are talking about requesting processing with in IIS, Worker Process (w3wp.exe ) takes care all of these. Worker Process runs the ASP.Net application in IIS. All the ASP.Net functionality inside IIS  runs under the scope of worker process. Worker Process is responsible for handling all kind of request, response, session data, cache data.  Application Pool is the container of worker process. Application pools is used to separate sets of IIS worker processes and enables a better security, reliability, and availability for any web application.
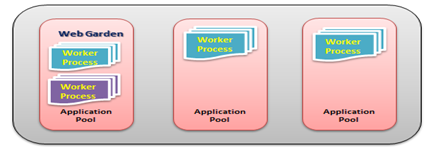
apppoolsNow, by default each and every Application pool contains a single worker process. Application which contains the multiple worker process called “Web Garden”. Below is the typical diagram for a web garden application.
WebGarden BasicIn the above diagram you can see, on of the application containing the  multiple worker process, which is now a web garden.
So, a Web application hosted on multiple server and access based on the load on servers is called Web Farms and When a single Application pool contain multiple Worker process is called web garden.
Create Web Garden in IIS 6 and IIS 7
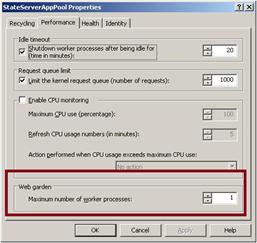
Now, I am going to show how you can change the Number of Worker process In both IIS 6 and IIS 7.  For IIS 6,  Right Click on Application Pool > Properties > Goto  Performance Tab.
WebGardenIIS6
In the “Performance Tab” Section you would have one option called “Web Garden” where worker process sets to “1”, you can set the number of worker process that you required.
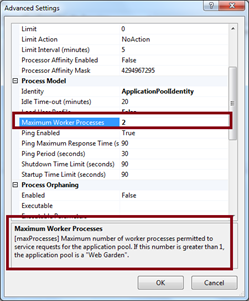
For IIS 7, Right Click on Application Pool > Go To Advance Settings > In Process Model section, you will have “Maximum Worker Processes” . You can change it more than 1 to make it as web garden.
WebGardenIIS7
In the above image you can also check the definition of Web Garden also.
You can find one of my previous article on the basic of same over here
Advantages of Web Farm and Web Garden :
Now, let’s have a look in to the advantages of both the Web farms and Web Garden.
Advantages of Web Farm
  • It provides high availability. If any of the server in the farm goes down, Load balancer can redirects the requests to other servers.
  • Provides high performance response for client requests.
  • Provides Better scalability of the web application and reduce the failure of application.
  • Session and other resource can be stored in a centralized location to access by the all server.
Advantages of Web Garden:
  • provides better application availability by sharing request between multiple worker process.
  • Web garden use processor affinity where application can swapped out based on preference and tag setting.
  • Less consumption of physical space for web garden configuration.
How to manage session in Web Farm Mode ?
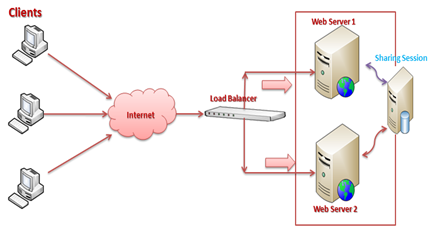
While using session, requests are distributed among different servers. By default session mode is set to In Proc where session data stored inside worker process memory. But, In Web farm mode we can share the session among all the server using a single session store location my making it Out proc (State Server or SQL Server Mode). So, if some of the server goes down and request transferred to the other server by the Load balancer session data should be available for that request.
sessionWebfarmIn the above diagram,  you can see we can both the IIS server sharing the same session data which is stored in out of worker process.  You can read one of my previous article “Exploring Session in ASP.NET” where I have explained how you can configure session mode for Out Process mode.
How to manage session in Web Garden Mode ?
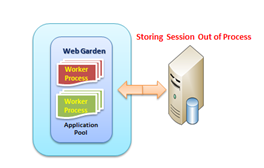
When we are using Web garden where request is being taking care by different worker process we have to make the session mode as out process session mode as described earlier. For Web Garden we have configure the out process with in same server but for different worker process.
webgardenSession2
While using Web garden with your application you need do couple of configuration settings in web.config in <process Model> section where you need to set certain properties like cpuMask, RequestLimit, webGarden, ClientConnectCheck etc.
Summary : When we host a web application over multiple web server to distributed the load among them  is called Web Farm and when One application having multiple worker worker process called Web garden.
In this blog post I have explained the very basics of what Web Farm is and what Web Garden is. As this blog post contains the basic information to understand the fundamentals of  web farms and web garden concept, I will be posting a separate article with details configuration setting for web garden and web farm.  You can read those below articles for more information

Original Post:

Universal groups, global groups, domain local groups

AD Group types: universal groups, global groups, domain local groups

Groups 

Distribution Groups — Used for email. Useful for programs such as MS Exchange.

Security Groups – Used to secure file/folders, printers, etc.

Local – Stored on the local SAM (Local Computers)
Domain Local – Stored on Domain Controllers.
Global Groups – Gives you a greater group scope.
Universal – Gives you an even broader group scope.

Group Scopes

Group scope normally describes the type of users that should be clubbed together in a way that is easy for their administration. Therefore, groups play an important part in domain. One group can be a member of other group(s), which is known as Group nesting. One or more groups can be members of any group in the entire domain(s) within a forest.
  • Domain Local Group: Use this scope to grant permissions to domain resources that are located in the same domain in which the domain local group was created. Domain local groups can exist in all mixed, native, and interim functional level of domains and forests. Domain local group memberships are not limited as users can add members as user accounts and universal and global groups from any domain. Nesting cannot be done in a domain local group. A domain local group will not be a member of another Domain Local or any other groups in the same domain.
  • Global Group: Users with similar functions can be grouped under global scope and can be given permission to access a resource (like a printer or shared folder and files) available in local or another domain in the same forest. Simply put, global groups can be use to grant permissions to gain access to resources that are located in any domain but in a single forest as their memberships are limited. User accounts and global groups can be added only from the domain in which the global group is created. Nesting is possible in Global groups within other groups as users can add a global group into another global group from any domain. They can be members of a Domain Local group to provide permission to domain specific resources (like printers and published folder). Global groups exist in all mixed, native, and interim functional level of domains and forests.
  • Universal Group Scope: these groups are precisely used for email distribution and can be granted access to resources in all trusted domain as these groups can only be used as a security principal (security group type) in a windows 2000 native or windows server 2003 domain functional level domain. Universal group memberships are not limited like global groups. All domain user accounts and groups can be a member of a universal group. Universal groups can be nested under a global or Domain Local group in any domain. 
Universal Group: can contain users and groups (global and universal) from any domain in the forest.  Universal groups do not care about trust.  Universal groups can be a member of domain local groups or other universal groups but NOT global groups.
Global Group: can contain users, computers and groups from same domain but NOT universal groups.  Can be a member of global groups of the same domain, domain local groups or universal groups of any domain in the forest or trusted domains.
Domain Local Group:  Can contain users, computers, global groups and universal groups from any domain in the forest and any trusted domain, and domain local groups from the same domain.  Can be a member of any domain local group in the same domain.
The short answer is that domain local groups are the only groups that can have members from outside the forest. And use global groups if you have trust, universal groups if you don’t care about trust.

When do we need to use local, global and universal group permission?

Use global security groups to group user (or computer) accounts with similar characteristics, for example members of Sales department.
Use domain local security groups to define access to resources (share, NTFS, printer),
for example you would create domain local group “DL ColorPrinter Print” and assign print permission to this group. Then you would put global security group Sales in “DL ColorPrinter Print” group to enable printing for sales department. If marketing department wants to use the same printer you have to create global group Marketing and put this group in “DL ColorPrinter Print” group. This strategy is called A-G-DL-P. Put accounts in global groups, global groups in domain local groups and assign permissions to domain local groups and you will assign permission only once. Everything else happens in Active Directory Users and Computers when you modify groups memberships.
Universal groups should only be used in multiple domain forest. Universal groups are used to nest global groups. Group strategy is then called A-G-U-DL-P.
In shot below are the details
Global Groups:
Use these to group users with similar needs within the organisation, sales people, finance people, manager’s etc
Domain Local Groups:
Use these to specify access to resources e.g. database users, Colour Printer Users.
Universal Groups
Use only in mulitiple domains to give forest wide privileges.

Original Post:

Kerberos in Active Directory Revealing the underpinnings of AD authentication


Although Kerberos might seem like black magic to many systems administrators, it’s one of Active Directory’s (AD’s) key underpinnings. Nearly all of Kerberos’s configuration is abstracted, making actual interaction with the protocol uncommon. However, Kerberos is used every time you log on to an AD-joined machine, as well as when you access network resources such as file shares and applications.
Rather than transmit your actual password over the network, Kerberos operates with a series of tickets. At a high level, when you log on to a machine you generate a series of exchanges with the domain controller (DC) that, if successful, ultimately grants you a ticket-granting ticket (TGT). Each time you subsequently want to access a service, such as a file share or application, you use the TGT to apply for a service ticket to the service or application you want to access.

Authentication

When you sit down at your workstation and press Ctrl+Alt+Del to log on and enter your credentials, your machine begins the process of authentication. At this step, the first thing that happens is your machine sends an AS_REQ or Authentication Service Request Kerberos message to the DC. In Kerberos, we call the DC a Key Distribution Center (KDC). Figure 1 shows the critical contents of such a request.
The client name is either the user’s user principal name (UPN) or the user’s legacy username (sAMAccountName). The service name in this case is always the same, a request to the krbtgt service in the user’s domain (or realm in Kerberos parlance). To prevent replay attacks whereby an attacker recycles an AS_REQ message, the current time is encrypted using a hash of the user’s password. This is where the five-minute clock skew tolerance most AD administrators are familiar with comes into play. If the encrypted timestamp isn’t within five minutes of the current time, the request is rejected.
When the KDC receives an AS_REQ message, the first thing it tries to do is decrypt the encrypted timestamp using its local copy of the user’s password hash. If this operation fails, then an error is returned to the client and the request doesn’t proceed any further. If the decryption is successful and the timestamp is within acceptable limits, the KDC returns an AS_REP (Authentication Service Reply) message to the user, with an embedded TGT. Figure 2 shows the contents of the AS_REP message. At this point, the user’s machine caches the TGT and session key for the lifetime of the TGT and disposes of the user’s password. By default, TGTs issued by AD KDCs expire after ten hours.
It’s important to note that AD’s Kerberos implementation requires the encrypted timestamp in the AS_REQ message. This initial exchange is known as pre-authentication. Kerberos as a standard doesn’t require the encrypted timestamp and instead is perfectly happy with an AS_REQ message that simply contains the client name and service name. The problem with this approach is that an attacker could mount a dictionary attack because each request containing a unique client name would either return an error stating the client wasn’t found or would yield a valid TGT for a given user.
As Figure 2 shows, the AS_REP message contains two pieces of encrypted data. The first component is encrypted with a hash of the user’s password and contains a session key and ticket expiry timestamp. The session key will be used to encrypt future communication with the KDC. The second component, the TGT, is encrypted with the KDC’s secret. The KDC’s secret in AD’s Kerberos implementation is stored as the password to the krbtgt user account that exists in every AD domain. The krbtgt account is created when the first DC in a domain is promoted; this account is crucial to the domain’s operation.


Obtaining a Service Ticket

After you log on, you probably have a myriad of applications and services that you want to access. In the world of Kerberos, anything you want to access is called a service. Common examples of services include file and print servers, database servers, and internal web applications. To access a service, you need to present a service ticket to the service. The first step is to identify the service principal name (SPN) of the service you want to access. Your machine or the application involved (e.g., Internet Explorer) is responsible for forming the SPN.
In the case of a file server called srv01.contoso.com, the SPN for the file service would be cifs/srv01.contoso.com. Likewise for a web application at web01.contoso.com, the SPN might be http/web01.contoso.com. A common problem that AD administrators encounter is one of duplicate SPNs, in which more than one user or computer in the directory has the same SPN registered in its servicePrincipalName attribute. When this happens, the KDC doesn’t know how to respond to a service ticket request because multiple services with the same name exist.
If you look at the servicePrincipalName attribute in AD, you’ll notice that neither of the two sample SPNs mentioned are defined on any computer account in AD. To reduce the amount of duplicate data stored in the directory, AD maintains a forest-level mapping of default SPNs to every computer account in the directory. Literally dozens of built-in SPNs apply to every computer defined in the attribute. The data is stored in the spnMappings attribute of the Directory Service object in the Configuration partition (under CN=Directory Service, CN=Windows NT, CN=Services, CN=Configuration); this attribute maps each computer object’s HOST service to a variety of other services. These services include the CIFS and HTTP services. If you wanted to define a particular service on every machine in your forest, you could easily modify this attribute to add the service to the list of predefined services.
Figure 3 shows the contents of a TGS_REQ (Ticket Granting Service Request) message that the KDC receives from a client when the client attempts to access a service. The first piece of information is the SPN of the service the client is requesting a ticket for. Encrypted with the session key the client received as part of the AS_REP earlier is the client’s name and a timestamp. This information is again used to prevent replay attacks whereby an attacker reuses a request message. Also included is a copy of the TGT the client received earlier.
When the KDC receives a TGS_REQ message, if a single entry for the SPN is specified, the timestamp is within range, and the TGT is valid (and unexpired), the client will receive a service ticket as part of a TGS_REP message, as Figure 4 shows. Inside the TGS_REP message is everything the client needs to access the service that it’s requesting access to.
Encrypted with the session key provided in the AS_REP message that Figure 2 shows is a second session key for use when communicating with the service the client has a ticket for. Encrypted with the service’s secret (e.g., the password of the machine account or service account) is a service ticket that the client will cache and use whenever it needs to access the service. Much like the TGT, service tickets have a maximum lifetime (which is ten hours by default in AD’s implementation of Kerberos) for which they can be reused. With a service ticket in hand, the client can now request access to the service.

Accessing Services

After the client has a service ticket, the application accessing the service can present that ticket to the service and request access. The mechanics of presenting the service ticket aren’t nearly as standardized as for obtaining the ticket because every application is different. In the case of an HTTP service, the service ticket is embedded in the headers of the HTTP request.
The service ticket is presented to the application in the form of a Kerberos AP_REQ message, as Figure 5 shows. The service decrypts the service ticket and obtains the session key, which it can use to decrypt the timestamp and client name fields, which are in turn used to validate the authenticity of the service ticket itself. It’s important to note that even if the service accepts the service ticket, at this point the client has merely authenticated to the service. The task of authorization is still up to the service, based on the information it has about the client.
The service ticket typically also includes data known as the Privilege Attribute Certificate, or PAC. In Figure 5, the PAC is called Token Information. If you refer back to Figure 2, this is the same token information the KDC included in the user’s TGT. The PAC is composed of information such as the user’s SID, group membership information, and user security rights/privileges. When a user presents a TGT to the KDC to request a service ticket, the KDC copies the token information from the TGT and includes it in the service ticket’s PAC field. This is the information that the service uses to construct an access token for the user and to verify the user’s authorization, typically based on group membership.
An additional Kerberos message known as an AP_REP or Application Reply is permissible after the user presents a service ticket in the AP_REQ message that Figure 5 shows. The Application Reply message is optional; in general, the application won’t send such a message unless an error occurs. One example of when an AP_REP message would be generated is in the case of a client that requests (in the AP_REQ message) that a service prove its identity through a process known as mutual authentication.


Process Overview

Figure 6 shows a recap of the message flow when a user decides to access a service on an application server. The user logs on to his or her workstation, generating an AS_REQ and AS_REP message sequence to the KDC, where the user receives a TGT if the credentials are valid. The user’s TGT is subsequently cached in memory and each time the user wants to access a service (such as a file server, print server, or web application), the user presents the TGT back to the KDC and requests a service ticket for the service. The user receives the service ticket and presents it to the application to request access.
If you’re using read-only domain controllers (RODCs) in your environment, the message flow is a bit different from what Figure 6 shows, depending on your password replication policies and where the passwords are cached. Remember that the KDC needs access to the service’s and user/computer’s secrets to issue service tickets and TGTs, respectively. By default, an RODC caches no passwords, so it has no access to the necessary secrets.
In the event that an RODC receives a request for a TGT or service ticket that it can’t fulfill (because of an uncached password), it passes the request back to a writeable DC that holds the necessary secrets to encrypt the response. The writeable DC sends the response to the RODC, which in turn sends it back to the client. If the RODC has the password cached for either the user or the service the user is trying to access, the RODC simply issues the TGT and/or service ticket in the same manner as shown in Figure 6.
If you refer back to Figure 2, you’ll see that the user’s TGT is encrypted using the KDC secret. This secret is the password to the krbtgt account, which all AD domains have. Considering the baseline design assumption of an RODC (i.e., the fact that it's compromised by default), it would be potentially catastrophic if the RODC contained the password to the domain-wide krbtgt account. If the RODC were compromised, the attacker could issue TGTs independently.
To mitigate this risk, each RODC has its own krbtgt account and is never aware of the passwords for either the domain-wide krbtgt account or another RODC’s krbtgt account. Writeable DCs have access to the passwords for all the RODC krbtgt accounts so they can decrypt TGTs issued by any RODC in the domain.

Transparent Authentication

Kerberos is implemented in such a way as to be almost transparent to AD administrators. Unlike many authentication schemes, Kerberos never requires that a password traverse the network, nor does it require a user’s password to be stored in memory after the initial logon. Both these benefits greatly reduce the inherent risk of other authentication protocols.
In addition, Kerberos gives users a single sign-on (SSO) experience. In a subsequent article, I’ll examine Kerberos delegation and protocol transition, as well as discuss common errors and troubleshooting techniques related to Kerberos. Delegation and protocol transition are features that many application developers use to extend SSO to enterprise resources without having to involve end users. Although these features work seamlessly, initially translating an application’s requirements into tangible tasks in the directory is a daunting task for many AD administrators.

Original Post: