Very Important Note
Please take Few precautions to avoid any unforeseen issues. Please read first.
***************************************************
1-Backup the registry Key of NTFS share and security of old server and keep in safe place.
HKLM\SYSTEM\CurrentControlSet\Services\LanmanServer\Shares
HKLM\SYSTEM\CurrentControlSet\Services\LanmanServer\Security
2- After migration restart the server and work station services using services.msc
3- Restart the server.
4- If still missing the copy the exported key to new server and double click to add in to the new server registry.
5- The restart the server services Start>Run>Services.msc and restart the physical server.
6- If the shared drive is different than the old server , then you need to edit the registry to update the new drive path.
7- Restart the physical server.
Reference Article:
http://blogs.technet.com/b/canitpro/archive/2014/11/06/step-by-step-migrating-a-2003-file-server-with-microsoft-file-server-migration-toolkit.aspx
http://www.techieshelp.com/migrate-files-and-shares-to-server-2012-guide/
***********************************************************************
On a recent post entitled, Step-By-Step: Migrating a Windows Server 2003 file server, NTFS and Share Rights to Windows Server 2012 R2, a question was asked as to why Microsoft File Server Migration Toolkit 1.2 was not utilized. As you know PowerShell is an IT professional’s best friend as it can substantially reduce the time it takes to complete certain tasks. However, there is nothing wrong with completing tasks via a graphical interface and utilization of the Microsoft File Server Migration Toolkit is a great example.
The Microsoft File Server Migration Toolkit assists system administrators migrate shared folders between servers running Windows operating systems. The toolkit utilizes the Distributed File System (DFS) and is capable of maintaining Universal Naming Convention (UNC) paths thus providing a simplified migration process.
Step 1: Installation and Preparation
Please take Few precautions to avoid any unforeseen issues. Please read first.
***************************************************
1-Backup the registry Key of NTFS share and security of old server and keep in safe place.
HKLM\SYSTEM\CurrentControlSet\Services\LanmanServer\Shares
HKLM\SYSTEM\CurrentControlSet\Services\LanmanServer\Security
2- After migration restart the server and work station services using services.msc
3- Restart the server.
4- If still missing the copy the exported key to new server and double click to add in to the new server registry.
5- The restart the server services Start>Run>Services.msc and restart the physical server.
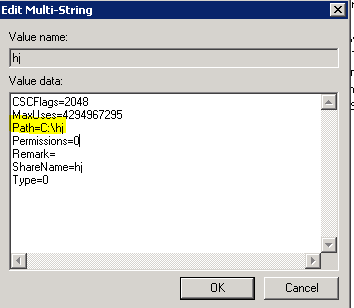
6- If the shared drive is different than the old server , then you need to edit the registry to update the new drive path.
Now on the right hand side you can see your shares. To change the drive letter of a share simply double click the share in question and then locate the section labeled “path” and change the drive letter to the drive of your new file server as highlighted in the image below.
7- Restart the physical server.
Reference Article:
http://blogs.technet.com/b/canitpro/archive/2014/11/06/step-by-step-migrating-a-2003-file-server-with-microsoft-file-server-migration-toolkit.aspx
http://www.techieshelp.com/migrate-files-and-shares-to-server-2012-guide/
***********************************************************************
On a recent post entitled, Step-By-Step: Migrating a Windows Server 2003 file server, NTFS and Share Rights to Windows Server 2012 R2, a question was asked as to why Microsoft File Server Migration Toolkit 1.2 was not utilized. As you know PowerShell is an IT professional’s best friend as it can substantially reduce the time it takes to complete certain tasks. However, there is nothing wrong with completing tasks via a graphical interface and utilization of the Microsoft File Server Migration Toolkit is a great example.
The Microsoft File Server Migration Toolkit assists system administrators migrate shared folders between servers running Windows operating systems. The toolkit utilizes the Distributed File System (DFS) and is capable of maintaining Universal Naming Convention (UNC) paths thus providing a simplified migration process.
Step 1: Installation and Preparation
- Download the Microsoft File Server Migration Toolkit
- Install the toolkit on the target Windows 2012 R2 Server
Note: It is suggested to install the complete installation as opposed to the custom installation
- Once the installation is completed, run the tool and create a new migration project by selecting New…
- Enter or browse the location where the project will be stored and logs and click Next
- If you have a DFS server, select Use the following DFS root server: and specify the server name of the server that hosts it and click Next. If not DFS server is present, leave everything blank and click Next
Note: The DFS Consolidation Root Wizard creates consolidated roots preserving the original UNC paths of consolidated files
- Enter or browse the location of the shares and click Next
Note: It is advised to create a new folder as to where the data will be copied to ensure a clean transfer
- Click Next to complete the wizard
- In the Project Screen, click on Add Server…
- Enter the name of the source server and click OK
- Select the shared folders on the source server that are required for migration and click Continue
- Validation is performed ensuring the shares are available. Once validation is completed, click Continue to enable the first copy of the data set
- Once the first copy is completed, click Continue which will copy the delta with respect to the first copy. Share directories on the target will also now be enabled once completed.
- On the Warning window, understand that access to the source shares will be disabled until the migration is completed. Click Yes to complete the migration